Introduction to [S]crape
Getting Started
Overview
Introduction
We’ll start by making sure you have [S]crape installed.
To start, I’ll assume you have installed [S]crape in a virtualenv.
Activate the virtual environment where you have installed [S]crape,
and run scrape:
$ scrape http://scrape.readthedocs.org
This should start [S]crape and open its documentation in Firefox [2].

your Firefox should have “WebDriver” displayed in the lower-right;
- this indicates that this Firefox is being controlled from [S]crape.
you should see a log of the plugins registered (scrape comes distributed with one -
affiliations);
- if you don’t see
scrape: INFO - ...registering plugins:in your [S]crape shell, then likely something is incomplete in your installation. You can continue with the exercises, but you will need to install plugins when you need them.
At the [S]crape >>> prompt type the following:
[S]crape >>> help
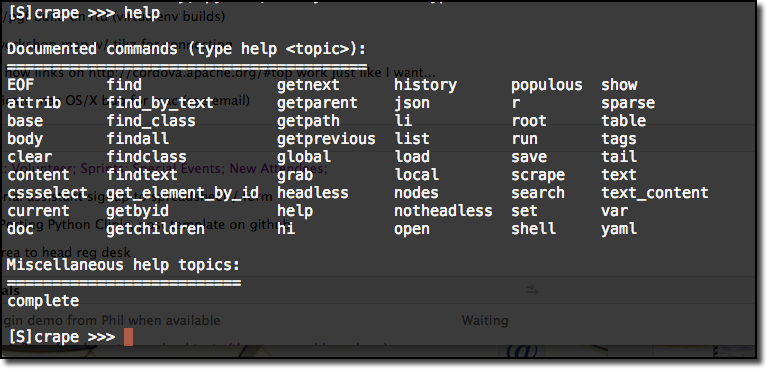
[S]crape gives you access to an HTML file or web page. It does this by parsing your web page into a tree of HTML nodes. You then traverse the tree of nodes, scraping the information you want from a selected nodes.
[S]crape starts by setting the root node of your HTML page [1]
to the <html> node.
Let’s show the contents of the current node:
[S]crape >>> show node
You should see the source for the two subnodes (children) of the <html> tag,
the <head> and <body> tags of the [S]crape document page.
This is the content of the document, rooted at html [3].
Just to confirm, lets count the current number of selected nodes:
[S]crape >>> nodes
When you will be looking at larger, more verbose selections, it can also be helpful to review just the tags of the selected nodes:
[S]crape >>> tags
The general starategy for using [S]crape is:
- select a scrape target (a web page);
- declare a table name (which will hold a set of variables);
- navigate the web page’s tree;
- declare a variable to collect information;
- capture the desired information;
- repeat as desired;
- save a table to a file;
- lastly, save your interactive commands to a script to run later.
When looking a [S]crape target,
it’s useful to also open the source view.
When you are starting with a new page,
you can easily search the various
tags and attributes of the html elements.
Do that now - right-click on your webpage, and select
View Page Source.
For this tutorial, we’ll save the headers to develop an outline for this page.
The outline we’d like to make consists of the headers, Contents:, Alternatives,
and so forth. In your source window, search for Contents:.
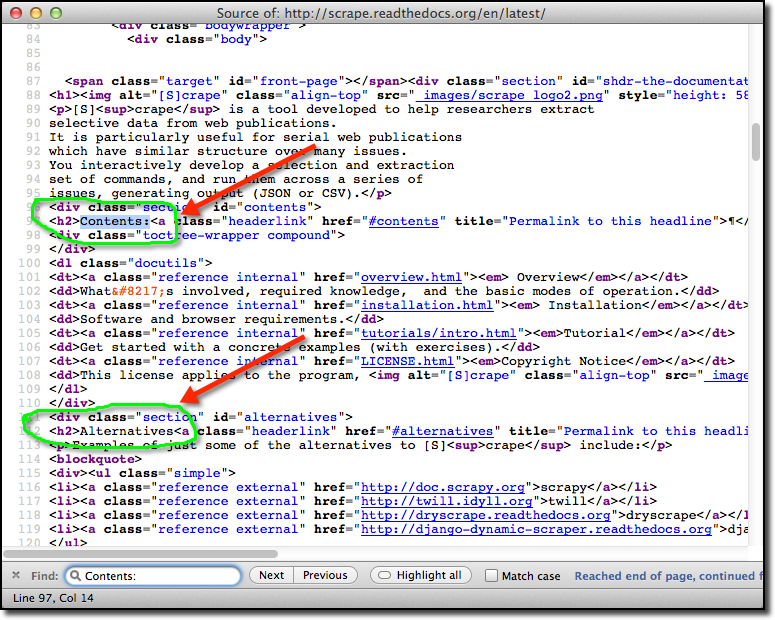
Contents: is in an <h2> tag, as is Alternatives; this looks like a reasonable
target for our scrape.
[S]crape provides a simplified interface to the libxml2 library,
so that most of the information you will find about xpath selectors
and cssselectors will work as you expect.
[S]crape also combines, extends and adds other commands
for interactive use.
For example, find_by_text will search
nodes selected by an xpath expression for a string.
You might like view http://www.w3schools.com/xpath/xpath_syntax.asp for reference during this tutorial.
Let’s find the subheadings on our target page to see if this will give us the page outline we’d like:
[S]crape >>> findall .//h2
[S]crape >>> show node
This should find all the <H2> nodes under the current node.
More than one node is found - show displays all of the currently selected nodes.

There are four active nodes, as verified by:
[S]crape >>> nodes
The text of these nodes seems like it would serve nicely as an outline, so lets capture those.
First, declare a table name and a variable to collect output (if you don’t declare a table name,
the default is scrape_table).
Setting var my_name will select a variable to collect data.
The variable does not need to exist (it will be created).
If you change tables before you’ve saved their output,
they are stored so you can later add to their variables (and output).
[S]crape >>> table outline
[S]crape >>> var topics
When you save the output from this table, it will be saved in a file outline.csv.
You can also save the output as json or yaml.
Once you save a table, its values are emptied.
So far, this table has one column - one variable.
To see what the various variables of a table currently have,
we issue the show out command
to show pending output (the current table’s contents).
[S]crape variables are lists of values.
Varible names are shown with a colon (my_var:),
and their values are shown preceded by a ‘-‘.
The text command will collect text contents of the currently
selected HTML nodes into the current variable.
[S]crape >>> show out
[S]crape >>> text
[S]crape >>> show out

There was no output pending prior to the text command.
If you wanted to save this now, the table command (with no argument)
will output the current table to a csv file with the same name
(if one already exsits, it will not be overwritten;
the name will be numerically extended).
If you want to save your script for later, look at your history. Only scrape commands which act on pages are saved in history. You can choose which parts of history you save to a script file.
[S]crape >>> history
[S]crape >>> help save
If you’d like, save your script now. You can edit saved [S]crape scripts with a text editor. You can add comments, which begin with ‘#’ and extend to the end of the line.
There is an alternate form for selecting tables and variables, which may help the commands in your script (and what they apply to) stand out. If you’d like, in place of:
table outline
var topics
you can equivalently write:
[ outline ]
< topics >
To exit [S]crape, see help EOF.
After our brief interactive session with [S]crape, here’s what our script looks like:
##
# [S]crape script to get outline of a page
#
# - gets the text of <h2> headings;
#
[ outline ]
< topics >
findall .//h2
text
table   # save outline.csv
Summary
In this introductory tutorial, we’ve
- shown one way to select nodes;
- defined tables and variables;
- saved selected content;
- saved a [S]crape script;
Please continue with the next tutorial.
Happy ![]() ing!
ing!
Footnotes
| [1] | You can easily set to the root of the document at any time to either the entire document,
or the body - see help doc and help body. |
| [2] | Be sure you’ve installed [S]crape and a current Firefox browser. |
| [3] | Note that when you look at an empty page (about:blank),
scrape will create a minimal parse tree for you (<html><head/><body/></head>). |